


Wildflowers can motivate the nature photographer like no other subject. The Canadian Rockies offer a rainbow spectrum of colourful flowers. They give you an unlimited range of artistic freedom and a distinct advantage as they don’t move away like photographing skittish animals.

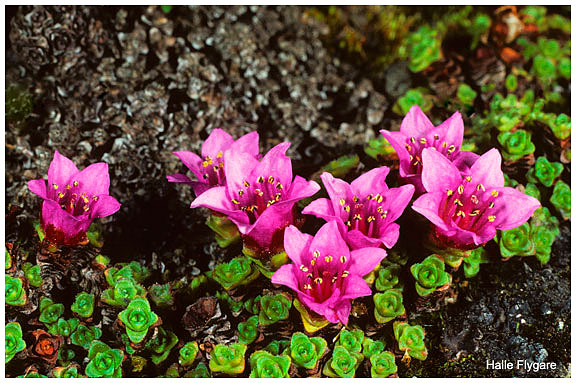
In late May through June and July search for wildflowers in the lower Montane zone. One of the first flowers to bloom, painting the hillsides with purple, is the Cutleaf Anemone. In the high country the forerunners of spring are the Yellow Avalanche Lily which can be found in profusion on saturated hillsides around the retreating snowline. More exciting is to see the yellow buds that have burst right through thinner snow areas. The alpine growing season is short, lasting for about a month from mid June to mid July. The alpine meadows in the peak season, resembles a beautiful flower garden with amazing selections of blazing colourful flowers. The most beautiful is a maze of the Indian Paintbrush of variations of red, pink to yellow. Higher up on the Arctic alpine slopes, well past the treeline, grow a numerous variety of blooms including Palla’s Wallflower, Mountain Harebell, Moss Campion and Purple Mountain Saxifrage. These slow growing dwarf tundra flowers are found close to the ground, seeking protection from weather and wind.
My favorite photography locations are in Banff, Kootenay, Yoho and Waterton Lakes National Parks and Bow Valley and Peter Lougheed Provincial Parks. These areas will keep you busy throughout the spring and summer for some outstanding wildflower photography.
Hunting Flowers from the Road #2
Many flowers are found along roads in ditches, gravel banks, hillsides or fields all in viewing distance from you car. A large number of my flower images have been photographed driving thousands of kilometers through our mountain parks. Early accessible drive to areas are Highwood Pass in Kananaskis Provincial Park, Bow Summit in Banff National Park and Sunwapta Pass in Jasper National Park which all offer great photography. The peak periods in the Rockies depends upon the amount of winter snowfall and the elevations which affect the melting temperatures. Record dates of blooming periods and flower locations. You might miss them one year but will acquire a very good knowledge for the future.
Wildflower Guide Book #3
The most valuable help as a companion to your camera and lenses is a good wildflower guidebook. For the last 20 years the colour-coded, Wildflowers of the Canadian Rockies, was a best seller. A revised edition, Wildflowers of the Rocky Mountains, published by Whitecap Books is now available in North America. The new publication has an additional 150 new species expanding the guidebook coverage of the Rocky Mountain range from northern New Mexico to southern Yukon. This newer edition includes the latest Latin names and standardized common names by United States Department of Agriculture in an attempt to eliminate several confusing common names.
Illustrations for the books are from my large collection of images photographed during numerous field trips starting in 1981 guiding heli-hikers in the Caribou Mountains, where the whole idea started for a colour-coded guidebook. The only good guidebook at that time was, Rocky Mountain Wildflowers by A.E. Porsild with colour drawings listed by family. The heli-hikers always asked “what is the name for this yellow, red or blue flower?”. My wife, Linda, also guided and suggested to me “you should do a book with colour-coded pages so anyone can find all the flowers”. The idea was born. I partnered with Dr. George Scotter to write the text and Hurtig Publishers in Edmonton to do the publishing.
(Wildflowers of the Canadian Rockies, by GW Scotter and H. Flygare 2007, White Cap Publishing, ISBN 1-55285-848-0 Cost $29.95 and is available at your local bookstore or online at Amazon.ca)
Lenses for Flowers #4
Lens #1 Wide angle AF- S Nikkor 12-24mm f/4. Closest focus distance 30 cm. at all zoom settings. Lens weight: 465g. This lens gives a great depth of field showing surrounding habitats. Flowers close to the lens get big and are, therefore, easily recognised. However, with short focal length, the size of flowers diminishes very quickly towards the background. Another use for the lens is from a low camera angle which, close to the ground, will silhouette flowers against the sky.
Lens #2 Macro AF Micro-Nikkor 60mm f/2.8D lens. Reproduction ratio: 1:10 to 1:1 (life size). Closest focus distance 22 cm. Lens weight: 455g. Auto extension rings enable you to go beyond life size. Follow the lens manual carefully to make sure you use the right kind of rings. If not they might damage the lens.
Lens#3 Macro Zoom-Micro Nikkor ED 70-180mm f/4.5-5.6. Closest focus distance 12 cm. Lens weight: 990g.
One of the helpful features of the lens is the continuous change of image size by zooming between 70mm and 180mm, without the need to change focused distance.
Wildflowers are mostly photographed with smaller focal length lenses. The advantage with a longer focal lens, is the ease to separate a plant’s background from any disturbing clutter. A longer lens can be especially useful for photographing aquatic flowers in ponds without getting wet, as well as a single flower from a distance without damaging surrounding vegetation.

The Right Light #5
The best light is early morning or later afternoon. The midday hours, with the sun high in the sky, results in flat and harsh light with no details of flower texture. On overcast cloudy days the light is diffused and the flowers radiate beautiful saturated colours, especially after a rain. On sunny days you can control the light with diffusion umbrellas held between the flower and the sun. Reflector panels which are available in gold, silver and white, bunch light into dark areas and fill in shadows bringing illumination to a closer balance. The gold reflector gives a warm cast, while silver and white have no significant effect on colours. Aluminum foil glued onto foam board, or used crumpled, works well for fill, bouncing light into small areas to be lightened up. A diffuser can also act as a windbreak bringing down or eliminating the need for a fast shutter speed.

Background Control and Depth of Field #6
An outstanding wildflower close-up is enhanced by a background that will not draw attention away from the subject. Compose the picture and pay attention beyond the subject. Use the depth of field preview button to check unwanted distractions. To eliminate clutter, experiment with artificial backgrounds such as a black velvet cloth I used for the Sparrowegg Lady’s Slipper picture, or use appealing coloured poster boards in various shades and forms. Black velvet reflects fewer lights than a black card. However, to get a smooth natural out-of-focus background there are several methods you can use. First determine the background of the subject which will affect the final outcome. If grasses and branches are close to the subject, they cannot be eliminated no matter what f-stop you use. The best solution is to have the subject far away from annoying backgrounds. Take a walk amongst the wildflowers and look for another clutter-free flower. Finding the right flowers suitable for two guide books, it took me several days, weeks or even seasons before I got the intended species with a sutiable background. If you are using a small depth of field, most of the images are out of focus, but with a larger depth of field nearly all are in focus. Large apertures from f/2.8/16 have very little depth of field. Small apertures from f/16/32 have lots of depth of field.
As Sharp as it Gets #7
If photographing several flowers, the required focal point for a maximum depth of field is 1/3, measured from the edge of the first flower. For the final outcome of composition, use the depth of field preview button to make sure the first flower is also sharp. The f/stops and shutter speed will affect the steadiness of the camera. It is important that you have a sturdy tripod with independently moving legs. Using a shorter center post, available with most tripod brands, you can position the tripod close to the ground. If you are shooting 1/15 of a second, lock up the camera mirror and use a cable release.
Also available for macro close-ups is a ground podfrom Kirk Enterprises which I find very useful. It has a unique rugged aluminum base with carrying handle and four rubber coated feet, keeping the mount stable on rocks and other surfaces. I use a heavy ball head to give it more ground hugging stability.
A helpful tool for short-stemmed flowers is a right-angle viewfinder. The image is viewed at a right angle through the camera optical axis. This gives better camera control than trying to work with the limited height available looking through the camera viewfinder with your head on the ground.

Electronic Flash and Macro Bracket #8
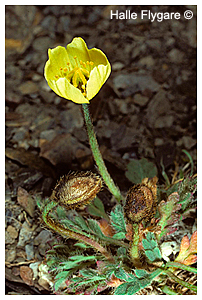
Wind is always a problem photographing flowers, being on the prairies, in the mountains or other places with no artificial or natural windbreak. On alpine slopes, waiting for the wind to die down, you have a split second of calm between wind gusts. For a maximum depth of field, you are most likely to set the camera to a slow shutter speed and large aperture. This is effective only on windless days, but with high magnification, even the slightest movements will blur the image. Photographing the low growing Rooted Poppy on a very windy day in the Bourgeau Lake-Harvey Pass area, made exposure practically impossible. I burned up film after film during several hours of fighting constant nagging wind, but got only few acceptable pictures.
It was after this outing, which consumed two days of hiking while searching for the Rooted Poppy that I decided to try out George Lepp’s flash bracket. This system is made up of two small flashes mounted on a bracket attached to the camera and connected with sync cords for automatic TTL exposures which gives you correct exposure all the time. And thanks to this system I could complete my first flower book project in two seasons, and the pictures turned out sharp even in the stormiest weather.
The short flash duration of 1/2000 to 1/5000 minimizes both camera shake and flower movement with no need for a tripod. The flashes give off enough light to allow a setting of f/16 to f/32, for maximum depth of field. One flash is pointed straight ahead for fill light, the other positioned at a 45 degree angle. To show textures, reduce the fill flash with one or two stops. For white flowers you might need to reduce the flash output 2- 3 stops. Picture on right - Rooted Poppy
 Nikon C1C1 Close-up Speedlight Commander Kit #9
 This new macro wireless close-up system offers easy and convenient flash photography without a tripod. This system puts an end to brackets and cords, a great benefit for low, handheld vertical or horizontal shots. Up to eight mini flashes SB-R200's can be mounted on different size lens rings and moved at will without losing power. Especially with a digital camera, you can see right away where the need is for flash output to areas which require more or less light. With the commander controller you can quickly adjust the amount of light..
During a two week stay in Colorado shooting plants for the new book, Wildflowers of the Rocky Mountains, I used my Nikon D2X camera and Nikon wireless close-up speedlight. The flash is a boon for flower photography and made my life easier photographing 60 new species mainly along Colorado’s highways and byways. It was, “stop, shoot and go. Without the flash unit another two weeks would have been required for the assignment.
Documentation and Composition #10
The real test in flower photography is showing plants growing in their natural habitat. Flowers aren’t going to run away so you have plenty of time for documentation and composition.
For documentation take three different optical magnifications:
1. A habitat shot of several flowers showing the environment and its surrounding areas.
2. Full frame picture showing plant head, stems and leaves for easy identification.
3. A close-up of a single flower head.
To finä tèe right coíposiôion, dï not mount the cameòa on a tòipod until all anglås have âeen checked witè a handheld cámera. Look through the viewfinder for best balanced arrangement. Æraméng is a critical factor whiãh ðrofiles your subjecô and can make or bråak a composition.
Fïr a íore artistic touch, do not crop the subject too tight. Leave room for the eyes to wander on either side of the subject. If unsure, divide the 35mm picture into 9 rectangular frames, “rules of thirds”. This works well in horizontal and vertical formats. Place the subject in the most appealing frame. If you’re hesitant, draw a paper sketch and check it through the viewfinder before snapping the picture.
Flowers grow as individuals or in groups and this must be considered for a most pleasing result when setting up your frame. Blossoms look best photographed in two’s or more. However, some flowers like Langsdorf’s Lousewort looks best as a single flower where as Indian Paintbrush or Arrowleaf Balsamroot are more pleasing as a group.
Shoot both vertical and horizontal formats of the same subject - horizontal for calendars and vertical for guidebooks and publications.

The Perfect Flower #11
From my own experience, even if you have found the ”perfect flower”, spend some time exploring surroundings areas for a more photogenic plant. There is nothing worse than packing up after hours of shooting and finding a more suitable flower a short distantce away. If you are in high Alpine areas make sure that you have plenty of time to hike back in daylight. Don’t get stuck in the dark.
Helpful Trivia #12
Carry a set of kneepads for rocks and gravel, and in cactus country, elbow pads. From experience, I can tell you an expensive trip to the emergency room consumes valuable shooting time to remove cactus thorns. There is nothing worst than crawling around on the ground with painful knees and elbows from shorter sticky thorns.
- Use a fine mist spray water bottle for enhancing the mood of the morning by adding dew drops to petals and leaves.
- Large tarp for wet and muddy places. Make sure not to damage plants.
- Hip waders for aquatic plants or creek crossings.
- Make sure you safely park your vehicle well off the road and it’s locked before heading out.
Gardening and Ethics #13
The term “gardening”, means to remove live flowers, grasses, branches and dead vegetation that interfere with your composition. This is against the law in National Parks, Provincial Parks and Nature Reserves.
However, the ethical way to get distracting vegetation out of the framed picture is to move it out of the way with strings, small sticks or flexible clamps available at photo stores. If location is not right with too much disturbing material, look for another location. If you can’t get close without damage to other flowers use a moderate telephoto lens to isolate the plant. In your darkroom you can also remove disturbing vegetation, with help of Photoshop’s digital imaging.
At last be careful while hiking through alpine wildflower fields by not stepping on wildflowers plants. Leave your photography location undisturbed for others to enjoy.


No comments:
Post a Comment